A Rainy Afternoon, Three Sheets of Paper and No Finished-Thing Goal
A rainy-afternoon paper session turns three ordinary sheets into quick trials, surprising marks and a small collection worth keeping without making a finished object.
The common mistake in a rainy-afternoon paper session is deciding what the paper must become before making a mark. That can turn a pleasant stretch of time into a hunt for a respectable result; three sheets work better as permission to try, notice and stop. Keep the aim modest: gather a handful of interesting marks, not a finished thing.
Set out three sheets of scrap paper, a pencil, a wax crayon, a washable felt-tip and a small piece of folded card. Add a teaspoon, a paper clip or a leaf from the windowsill if one is handy. These are prompts, not supplies you need to complete a project. Use whatever paper and pens are already within reach, and let the weather provide the occasion rather than a deadline.
1. Give each sheet a different invitation
Write one small prompt in a corner of each sheet: pressure, motion and surprise. These are loose invitations, not rules. They give your attention somewhere to land without deciding what the marks should look like.
Keep the prompts visible as you work. If an idea arrives that does not fit, follow it; the words are there to loosen the hand, not police it. A sheet can contain several attempts, including a mark you dislike and the mark that appears because of it.
Make the working area easy to reset. Put the pens together, keep a clear patch for each sheet and leave the folded card nearby as a simple blotter or drawing surface. A teaspoon can hold a paper corner flat, while a paper clip can secure two loose edges; neither needs to become part of the artwork.
2. Let pressure leave a visible trace
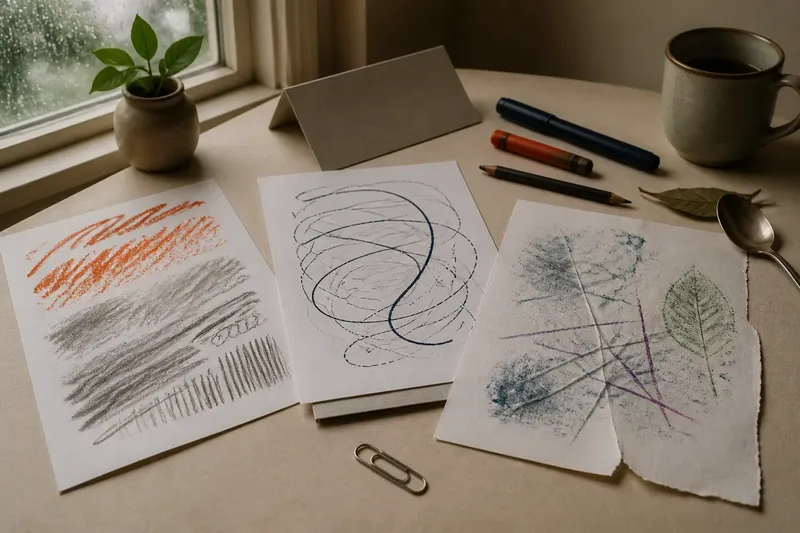
On the first sheet, draw a short row of marks with the wax crayon. Press lightly at first, then more firmly, and notice what changes: the line’s darkness, its edge, the way the paper catches the wax. Try a slow curve beside a quick zigzag. The point is not to produce a tidy pattern but to give your hand a few different jobs.
Now lay the sheet on the folded card and rub the crayon across a small area. The card supports the paper like a table mat, making the rubbed patch easier to compare with the drawn lines. Shift the card underneath and try again. A slight change of support may make the texture uneven, and that unevenness is useful information for the next mark.
Use pencil for a quieter contrast. Draw with its side, then with its point; try a long stroke and a cluster of short ones. If the pencil leaves a soft grey field that feels more interesting than the outline you intended, leave it alone. A mark does not owe you an explanation.
3. Make motion without drawing an object
Use the second sheet to follow movement rather than depict a thing. Slide the paper clip gently along the page while tracing beside it with the felt-tip, or move the pen in a loose line as your other hand turns the sheet. Keep the tool’s point on the paper and let the line record the movement, not a recognisable picture.
Try a few changes of pace: a slow sweep, a brief pause, then a quick turn. You may get a line that bunches up, breaks away or crosses itself. Those changes can make a livelier page than a careful outline, because the marks show what the hand did rather than what it tried to imitate.
Say you have a grey afternoon, one felt-tip and a sheet that keeps sliding. You place the folded card beneath one corner and draw while slowly rotating the paper. The expected visible result is a set of curved paths with different crossings; if one path catches your eye, circle it lightly in pencil rather than turning the whole page into a planned picture.
4. Invite a small surprise
Use the third sheet for a mark you cannot quite control. Draw a few felt-tip lines, then place the paper on the folded card and rub the back with the bowl of a teaspoon. Keep the pressure gentle, and lift the page to see which lines transferred, blurred or stayed put. The uneven result is the point: it shows what happened in this particular pairing of pen, paper and pressure.
You can also fold the sheet loosely, open it again and draw along one of the creases. Or place a leaf beneath it and rub with the crayon’s side to catch its outline. These are short trials, not a route to a polished print. Try one change at a time so you can see which part of the process made the mark shift.
If the paper tears, wrinkles or smudges, keep that area visible. A torn edge beside a clean line can be more intriguing than either on its own. Do not add an extra flourish simply to cover a result you did not expect.
5. What should you do with an odd mark?
How do you keep a mark that looks accidental?
Leave it in place and give it room. If you want to draw attention to it, add a small pencil bracket or a dot nearby, rather than outlining the mark until it looks like something familiar.
What if a trial makes a mess?
Turn the sheet around and look at it from another direction before deciding. If it still feels uninteresting, fold that area out of view and use the remaining space for a different mark; the attempt has still told you something about the materials.
How can you compare the three sheets?
Lay them side by side and look for a quality that appears in more than one place: a scratchy edge, a repeated curve or a patch where pressure changed the surface. You need not make the sheets match; the comparison is simply a way to notice which actions held your attention.
When should you stop?
Stop when you have a few marks you want to look at again, or when your hand wants a break. Leaving open space on a page is not unfinished business; it is room for the next rainy afternoon, if there is one.
6. Keep the evidence, not a finished object
Choose the marks that still interest you when the pens are put down. You might tear out a small corner, fold a sheet so one patch sits on top, or keep all three together with a paper clip. There is no need to turn the trials into a card, collage or decoration. Keeping the sheet as it is preserves the route from first mark to surprise.
Write a few plain words on the back: “crayon rubbed over folded card” or “line drawn while paper turned”. This is a note to your future self, not a title or explanation. It helps you remember what you changed if you feel like returning to that particular effect.
For a simple next-time prompt, choose one mark from each page and ask what action produced it: pressure, movement, surface or an unexpected slip. That question keeps the rainy-afternoon paper session open to another round of small trials, without asking any sheet to become a finished thing.